Bài trước chúng ta đã làm việc với MySql, thì ngần ngại gì mà không tìm hiểu ngay cách xây dựng chức năng đăng nhập trong hệ thống.
Contents
Cài đặt
Chúng ta sử dụng lại source code cũ tại đây. Các bạn theo dõi commit đễ theo dõi sự thay đổi.
Ta cài thêm một số package để hỗ trợ:
npm install bcrypt dotenv express-session- bcrypt: giúp mã hóa mật khẩu
- dotenv: để lấy dữ liệu từ file môi trường
.env - express-session: để lưu trạng thái đăng nhập cũng như thông tin đăng nhập
Mở trình quản lý CSDL (MySql), chạy câu query để tạo bảng users – nơi lưu trữ thông tin đăng nhập.
CREATE TABLE IF NOT EXISTS `users` (
  id int(11) NOT NULL PRIMARY KEY AUTO_INCREMENT,
  name varchar(100) NOT NULL,
  password varchar(255) NOT NULL,
  email varchar(100) NOT NULL
) ENGINE=InnoDB DEFAULT CHARSET=utf8;
Bạn nào chưa biết cách setup thì có thể theo dõi lại code, hoặc bài biết trước tại đây
Cập nhật lại cấu trúc file
Mở file server.js update lại một xíu
...
// add
const session = require('express-session');
require('dotenv/config');

...
// add
app.use(session({
    secret: process.env.SESSION_SECRET,
    resave: true,
    saveUninitialized: true,
}))

...
// change
require('./app/routes/route')(app);
Phần trên ta khai báo để sử dụng session, dùng cho kiểm tra xác thực người dùng. Đồng thời tạo file .env ngoài thư mục gốc và khai báo như sau:
SESSION_SECRET=datnquit
BCRYPT_SALT_ROUND=10
Vì authentication là 1 phần khác, nên ta thay đổi phần khai báo route 1 xíu. Thay vì require file todo.route.js thì ta sẽ tạo ra 1 file route.js để quản lý các file route khác.
Trong folder routes tạo lần lượt các file router khác.
route.js
module.exports = app => {
    require('./auth.route')(app);
    require('./todo.route')(app);
    require('./web.route')(app);
}
auth.route.js
const login = require('../controllers/auth/login.controller');
const register = require('../controllers/auth/register.controller');
const authMiddleware = require('../middlewares/auth.middleware');

module.exports = app => {
    var router = require('express').Router();

    router.get('/login', authMiddleware.isAuth, login.showLoginForm)
    .post('/login', login.login)

    .get('/register', authMiddleware.isAuth, register.create)
    .post('/register', register.register)

    .get('/logout', authMiddleware.loggedin, login.logout)

    app.use(router);
}
Chúng ta tạo các middleware để có thể giúp trang cho chức năng đăng nhập trở nên mượt mà hơn, phần này chưa có gì để nói cả, khi nào tới function mình sẽ nói rõ hơn.
web.route.js
const authMiddleware = require('../middlewares/auth.middleware');

module.exports = app => {
    var router = require('express').Router();

    router.get('/home', authMiddleware.loggedin, (req, res) => {
        res.render('home');
    });

    app.use(router);
}
Route /home là route sau khi xác thực thành công, nếu không đăng nhập mà cố truy cập vào, thì sẽ bị chuyển hướng về trang đăng nhập.
Tạo model
Ta khai báo những function để có thể dễ dàng làm việc với Database. Ta tạo file user.model.js trong folder models:
const sql = require("./db");

const User = function(user){
    this.name = user.name;
    this.password = user.password;
    this.email = user.email;
};

User.create = (newUser, result) => {
    sql.query("INSERT INTO users SET ?", newUser, (err, res) => {
        if (err) {
            console.log("error: ", err);
            result(err, null);
            return;
        }
        console.log("created user: ", { id: res.insertId, ...newUser });
        result(null, { id: res.insertId, ...newUser });
    });
};

User.findByEmail = (email, result) => {
    sql.query(`SELECT * from users WHERE email = '${email}'`, (err, res) => {
        if (err) {
            result(err, null);
            return;
        }
        if (res.length) {
            result(null, res[0])
            return;
        }
        result(null, null);
    });
}

module.exports = User;
Xây dựng các Controller
Trong folder controllers, ta tạo folder auth để chứa những controller liên quan đến authentication. Bài hôm nay chúng ta chỉ xây dựng chức năng đăng ký, đăng nhập. Ở những bài sau mình sẽ xây dựng thêm, và tiếp tục tạo những controller khác vào bên trong này.
register.controller.js
const User = require('../../models/user.model');
const bcrypt = require('bcrypt');
require('dotenv/config');

exports.create = (req, res) => {
    res.render('auth/register');
}

exports.register = (req, res) => {
    const { email, password, name } = req.body;

    if (email && password && name) {
        User.findByEmail(email, (err, user) => {
            if (err || user) {
                // A user with that email address does not exists
                const conflictError = 'User credentials are exist.';
                res.render('auth/register', { email, password, name, conflictError });
            }
        })

        bcrypt.hash(password, parseInt(process.env.BCRYPT_SALT_ROUND)).then((hashed) => {
            // Create a User
            const user = new User({
                name: name,
                email: email,
                password: hashed
            });
            User.create(user, (err, user) => {
                if (!err) {
                    res.redirect('/login');
                }
            })
        });
    } else {
        const conflictError = 'User credentials are exist.';
    res.render('auth/register', { email, password, name, conflictError });
    }
}
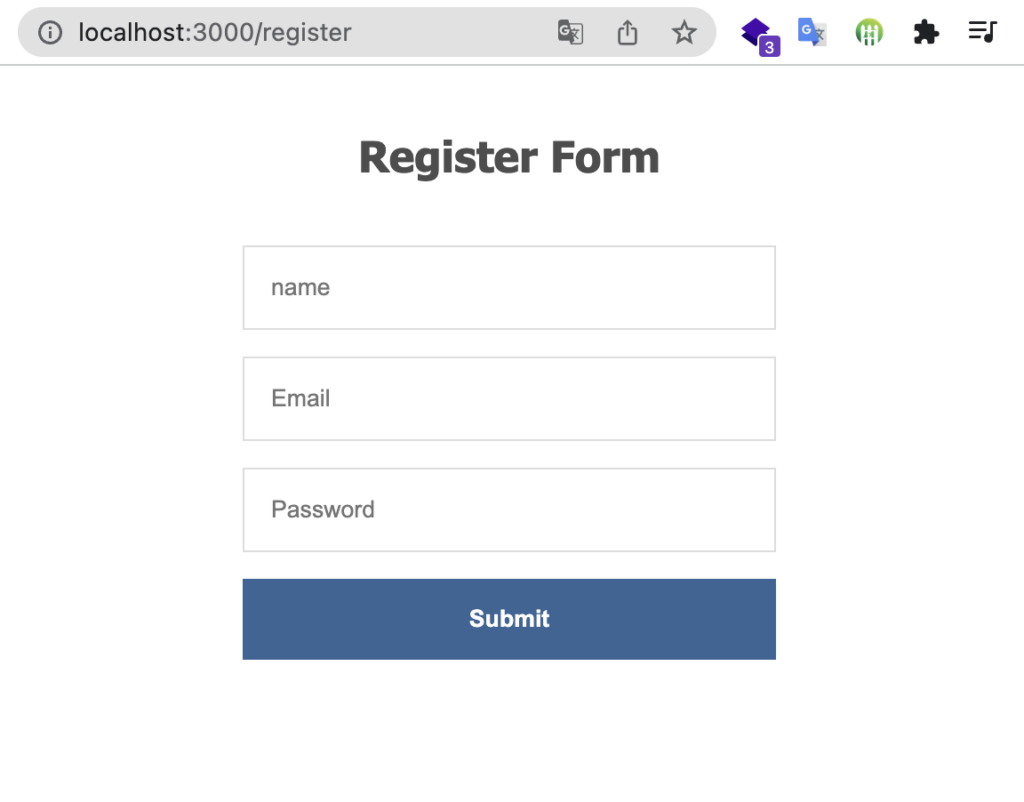
Phần đăng ký, đầu tiên có 1 function giúp hiển thị form đăng ký. Sau khi gửi thông tin lên, ta tiến hành kiểm tra email đã tồn tại hay chưa, và tiến hành tạo user mới với mật khẩu đã được mã hóa.

login.controller.js
const User = require('../../models/user.model');
const bcrypt = require('bcrypt');

exports.showLoginForm = (req, res) => {
    res.render('auth/login');
}

exports.login = (req, res) => {
    const { email, password } = req.body;

    if (email && password) {
        User.findByEmail(email, (err, user) => {
            if (!user) {
                res.redirect('/login');
            } else {
                bcrypt.compare(password, user.password, (err, result) => {
                    if (result == true) {
                        req.session.loggedin = true;
                        req.session.user = user;
                        res.redirect('/home');
                    } else {
                        // A user with that email address does not exists
                        const conflictError = 'User credentials are not valid.';
                        res.render('auth/login', { email, password, conflictError });
                    }
                })
            }
        })
    } else {
        // A user with that email address does not exists
        const conflictError = 'User credentials are not valid.';
        res.render('auth/login', { email, password, conflictError });
    }
}

exports.logout = (req, res) => {
    req.session.destroy((err) => {
        if (err) res.redirect('/500');
        res.redirect('/');
    })
}
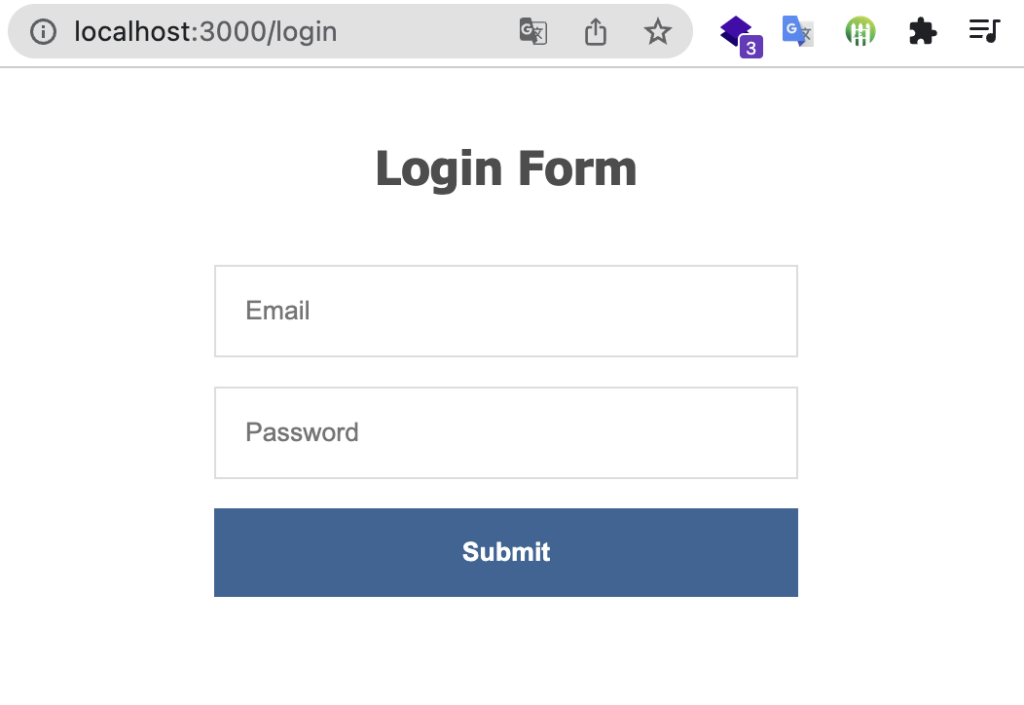
Phần xử lý đăng nhập, ta tìm user theo email, và dùng bcrypt để kiểm tra mật khẩu nhập vào mật khẩu của user. Nếu đăng nhập thành công, ta lưu thông tin đăng nhập vào session. Nếu muốn đăng xuất, ta cứ truy cập vào đường dẫn http://localhost:3000/logout đã khai báo ở trên.

Tạo middleware
Ta tạo folder middlewares bên trong folder app. Tiếp tục tạo file auth.middleware.js bên trong.
auth.middleware.js
exports.loggedin = (req, res, next) => {
    if (req.session.loggedin) {
        res.locals.user = req.session.user
        next();
    } else {
        res.redirect('/login')
    }
}

exports.isAuth = (req, res, next) => {
    if (req.session.loggedin) {
        res.locals.user = req.session.user
        res.redirect('/home');
    } else {
        next();
    }
}- loggedin dùng để kiểm tra xác thực.
- isAuth để chuyển hướng về trang home khi người dùng muốn truy cập vào trang login khi đã xác thực người dùng.
Xây dựng các View
Tạo file home.ejs trong folder views
home.ejs
<!DOCTYPE html>
<html lang="en">
<head>
    <meta charset="UTF-8">
    <meta http-equiv="X-UA-Compatible" content="IE=edge">
    <meta name="viewport" content="width=device-width, initial-scale=1.0">
    <title>Home</title>
</head>
<body>
    Hello <%= user.name %>
</body>
</html>
Trong folder views, tạo thêm folder auth. Trong folder auth ta mới tạo những cái view liên quan đến authentication.
Tiếp tục tạo file login.ejs bên trong folder auth này.
login.ejs
<!DOCTYPE html>
<html lang="en">
<head>
    <meta charset="UTF-8">
    <meta http-equiv="X-UA-Compatible" content="IE=edge">
    <meta name="viewport" content="width=device-width, initial-scale=1.0">
    <title>Login Form Tutorial</title>
    <style>
        .login-form {
            width: 300px;
            margin: 0 auto;
            font-family: Tahoma, Geneva, sans-serif;
        }
        .login-form h1 {
            text-align: center;
            color: #4d4d4d;
            font-size: 24px;
            padding: 20px 0 20px 0;
        }
        .login-form input[type="password"],
        .login-form input[type="text"] {
            width: 100%;
            padding: 15px;
            border: 1px solid #dddddd;
            margin-bottom: 15px;
            box-sizing:border-box;
        }
        .login-form input[type="submit"] {
            width: 100%;
            padding: 15px;
            background-color: #356596;
            border: 0;
            box-sizing: border-box;
            cursor: pointer;
            font-weight: bold;
            color: #ffffff;
        }
    </style>
</head>
<body>
    <div class="login-form">
        <h1>Login Form</h1>
        <form action="/login" method="POST">
            <input type="text" name="email" placeholder="Email"
                <% if (typeof email != "undefined" && email) { %> value="<%= email %>"<% } %>  required>
            <input type="password" name="password" placeholder="Password"
                <% if (typeof password != "undefined" && password) { %> value="<%= password %>"<% } %> required>
            <% if (typeof conflictError != "undefined" && conflictError) { %>
                <div class="text-danger text-left  mb-3"><%= conflictError %></div>
            <% } %>
            <input type="submit">
        </form>
    </div>
</body>
</html>
Tiếp tục tạo file register.ejs bên trong folder auth này.
register.ejs
<!DOCTYPE html>
<html lang="en">
<head>
    <meta charset="UTF-8">
    <meta http-equiv="X-UA-Compatible" content="IE=edge">
    <meta name="viewport" content="width=device-width, initial-scale=1.0">
    <title>Register Form Tutorial</title>
    <style>
        .login-form {
            width: 300px;
            margin: 0 auto;
            font-family: Tahoma, Geneva, sans-serif;
        }
        .login-form h1 {
            text-align: center;
            color: #4d4d4d;
            font-size: 24px;
            padding: 20px 0 20px 0;
        }
        .login-form input[type="password"],
        .login-form input[type="text"] {
            width: 100%;
            padding: 15px;
            border: 1px solid #dddddd;
            margin-bottom: 15px;
            box-sizing:border-box;
        }
        .login-form input[type="submit"] {
            width: 100%;
            padding: 15px;
            background-color: #356596;
            border: 0;
            box-sizing: border-box;
            cursor: pointer;
            font-weight: bold;
            color: #ffffff;
        }
    </style>
</head>
<body>
    <div class="login-form">
        <h1>Register Form</h1>
        <form action="/register" method="POST">
            <input type="text" name="name" placeholder="name"
                <% if (typeof name != "undefined" && name) { %> value="<%= name %>"<% } %> required>
            <input type="text" name="email" placeholder="Email"
                <% if (typeof email != "undefined" && email) { %> value="<%= email %>"<% } %>  required>
            <input type="password" name="password" placeholder="Password"
                <% if (typeof password != "undefined" && password) { %> value="<%= password %>"<% } %> required>

            <% if (typeof conflictError != "undefined" && conflictError) { %>
                <div class="text-danger text-left  mb-3"><%= conflictError %></div>
            <% } %>
            <input type="submit">
        </form>
    </div>
</body>
</html>
Kết luận
Trên đây mình vừa chia sẽ những điều căn bản trước tiên. Những bài sau mình sẽ hướng dẫn những chức năng khác liên quan đến authentication như quên mật khẩu, xác thực email, …
Mình không khuyến khích các bạn code tay toàn bộ các chức năng, không sử dụng các module mà chưa thành thạo cũng như hiểu về nó.
Nguồn tham khảo:
Rất mong được sự ủng hộ của mọi người để mình có động lực ra những bài viết tiếp theo.
{\__/}
( ~.~ )
/ > ♥️ I LOVE YOU 3000
JUST DO IT!
