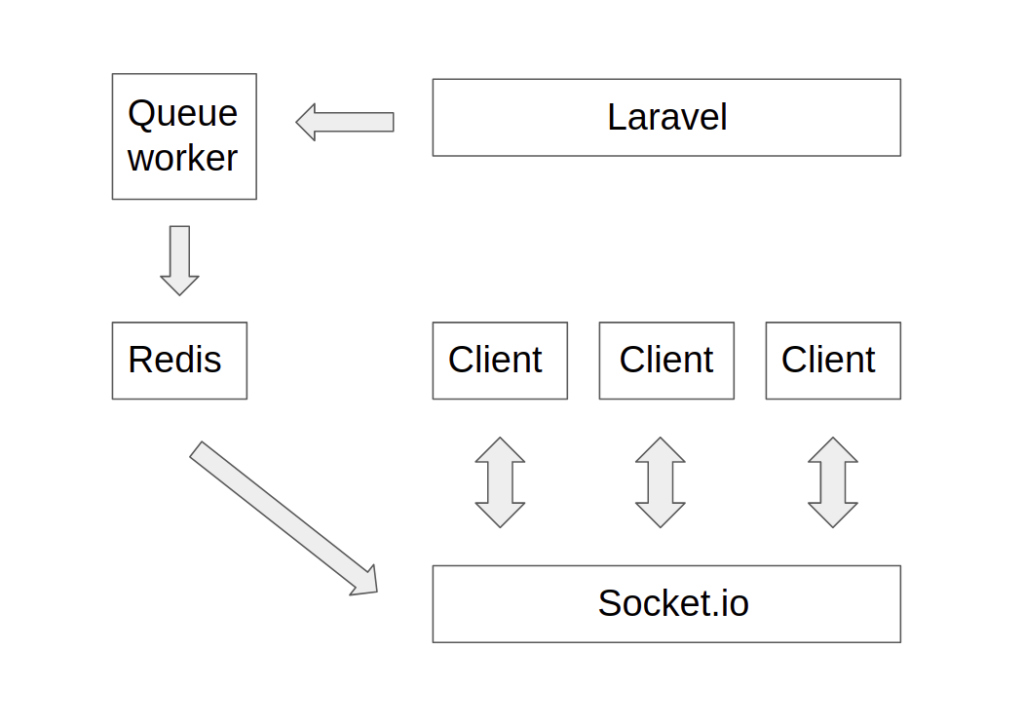
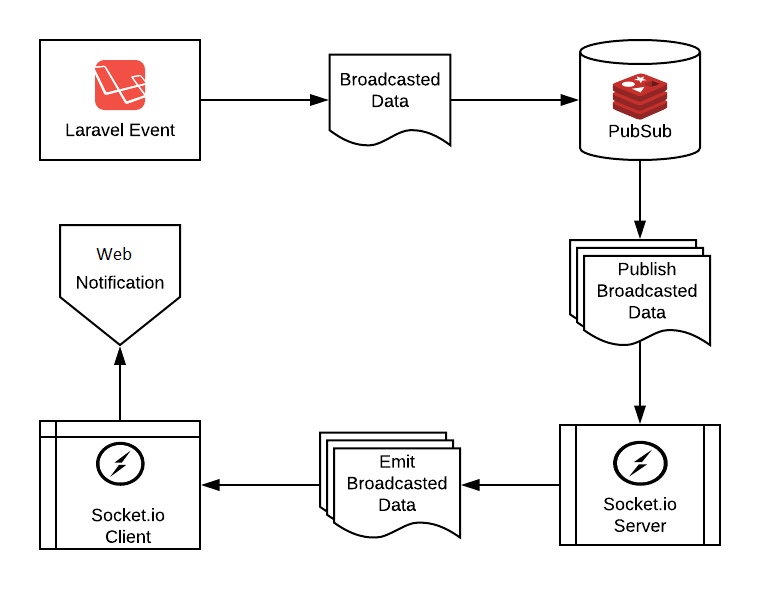
WebSockets được dùng để mang lại các thay đổi trên giao diện người dùng đáp ứng thời gian thực (Realtime). Cùng mình tìm hiểu những tính năng mà nó mang lại nhé!
Contents
Giới thiệu
WebSocketschắc không xa lạ gì với những bạn đã sử dụng socket.io – một package mạnh mẽ của nodejs được sử dụng rất phổ biến. Khi dữ liệu được cập nhật trên server, một gói tin sẽ được gửi qua kết nối WebSockets tới client.
Xây dựng một ứng dụng như vậy rất dễ dàng, Laravel giúp bạn dễ dàng “broadcast” các event phía máy chủ của bạn qua kết nối WebSockets. Broadcasting của Laravel cho phép bạn chia sẻ event giữa server-side code với client-side Javascript code.
Trong bài viết này, mình sẽ hướng dẫn các bạn cách cài đặt và sử dụng Broadcasting của Laravel bằng Laravel Echo
Cài đặt Broadcasting với Redis
Chuẩn bị
- Laravel, NodeJs, Redis
- Tốt nhất thì cứ cài bảng mới nhất nha
- Ở đây mình dùng Laravel 8.5, Node v14.8.0, Redis v6.2.4 với port mặc định 6379

Server-side
Các config để sử dụng broadcasting với Laravel đều được lưu trong file config/broadcasting.php . Laravel hỗ trợ các broadcast driver như: Pusher, Redis, Ably, log cho quá trình phát triển và debugging. Nếu 'default' => env('BROADCAST_DRIVER', 'null'), là null, bạn sẽ vô hiệu hóa tính năng broadcast.
<?php

return [

    /*
    |--------------------------------------------------------------------------
    | Default Broadcaster
    |--------------------------------------------------------------------------
    |
    | This option controls the default broadcaster that will be used by the
    | framework when an event needs to be broadcast. You may set this to
    | any of the connections defined in the "connections" array below.
    |
    | Supported: "pusher", "ably", "redis", "log", "null"
    |
    */

    'default' => env('BROADCAST_DRIVER', 'null'),

    /*
    |--------------------------------------------------------------------------
    | Broadcast Connections
    |--------------------------------------------------------------------------
    |
    | Here you may define all of the broadcast connections that will be used
    | to broadcast events to other systems or over websockets. Samples of
    | each available type of connection are provided inside this array.
    |
    */

    'connections' => [

        'pusher' => [
            'driver' => 'pusher',
            'key' => env('PUSHER_APP_KEY'),
            'secret' => env('PUSHER_APP_SECRET'),
            'app_id' => env('PUSHER_APP_ID'),
            'options' => [
                'cluster' => env('PUSHER_APP_CLUSTER'),
                'useTLS' => true,
            ],
        ],

        'ably' => [
            'driver' => 'ably',
            'key' => env('ABLY_KEY'),
        ],

        'redis' => [
            'driver' => 'redis',
            'connection' => 'default',
        ],

        'log' => [
            'driver' => 'log',
        ],

        'null' => [
            'driver' => 'null',
        ],

    ],

];
Trước khi broadcasting bất kì event nào, bạn phải đăng ký sử dụng App\Providers\BroadcastServiceProvider trong file config/app.php. Mặc định provider này sẽ bị comment, chỉ cần tìm đến mảng providers và xóa bỏ comment đi.
/*
 * Application Service Providers...
 */
....
App\Providers\BroadcastServiceProvider::class,
....
Mở file .env update BROADCAST_DRIVER=redis, và cấu hình redis sao cho có thể kết nối với Redis được cài đặt trên máy nhá.
Cài đặt Broadcast Driver
Ở đây mình sử dụng Redis broadcaster nên mình sẽ cài thêm thư viện Predis:
composer require predis/predisCấu hình cho Queue
Trước khi broadcasting event, bạn cần cấu hình và chạy queue:listen. Tất cả event được broadcasting qua queue job sẽ giúp giảm thời gian phản hồi của ứng dụng không bị chậm đi.
Client-side
Laravel không implementation một Socket.IO server sẵn nên bạn cần phải cài đặt và cấu hình nó để sử dụng. Và Laravel khuyến khích sử dụng Laravel Echo Server để nhận các event ở phía client-side
Bạn cần cài đặt package này global
npm install -g laravel-echo-serverSau đó chạy lệnh khởi tạo:
laravel-echo-server init
? Do you want to run this server in development mode? Yes
? Which port would you like to serve from? 6001
? Which database would you like to use to store presence channel members? redis
? Enter the host of your Laravel authentication server. http://127.0.0.1:8000
? Will you be serving on http or https? http
? Do you want to generate a client ID/Key for HTTP API? No
? Do you want to setup cross domain access to the API? (y/N)
PS C:\Users\NguyễnQuangđạt> laravel-echo-server init
? Do you want to run this server in development mode? Yes
? Which port would you like to serve from? 6001
? Which database would you like to use to store presence channel members? redis
? Enter the host of your Laravel authentication server. http://127.0.0.1:8000
? Will you be serving on http or https? http
? Do you want to generate a client ID/Key for HTTP API? Yes
? Do you want to setup cross domain access to the API? Yes
? Specify the URI that may access the API: http://localhost:3000
? Enter the HTTP methods that are allowed for CORS: GET, POST
? Enter the HTTP headers that are allowed for CORS: Origin, Content-Type, X-Auth-Token, X-Requested-With, Accept, Author
ization, X-CSRF-TOKEN, X-Socket-Id
? What do you want this config to be saved as? laravel-echo-server.json
CLI sẽ đưa ra các lựa chọn cho bạn, sau khi hoàn thành, một file laravel-echo-server.json sẽ được sinh ra:
{
    "authHost": "http://127.0.0.1:8000",
    "authEndpoint": "/broadcasting/auth",
    "clients": [
        {
            "appId": "xxx",
            "key": "xxx"
        }
    ],
    "database": "redis",
    "databaseConfig": {
        "redis": {
            "port": "6379",
            "host": "localhost"
        },
        "sqlite": {
            "databasePath": "/database/laravel-echo-server.sqlite"
        }
    },
    "devMode": true,
    "host": null,
    "port": "6001",
    "protocol": "http",
    "socketio": {},
    "secureOptions": 67108864,
    "sslCertPath": "",
    "sslKeyPath": "",
    "sslCertChainPath": "",
    "sslPassphrase": "",
    "subscribers": {
        "http": true,
        "redis": true
    },
    "apiOriginAllow": {
        "allowCors": true,
        "allowOrigin": "http://localhost:3000",
        "allowMethods": "GET, POST",
        "allowHeaders": "Origin, Content-Type, X-Auth-Token, X-Requested-With, Accept, Authorization, X-CSRF-TOKEN, X-Socket-Id"
    }
}
Bạn thực hiện chạy laravel-echo-server start để khởi động Laravel Echo Server
laravel-echo-server start

L A R A V E L  E C H O  S E R V E R

version 1.6.2

⚠ Starting server in DEV mode...

✔  Running at localhost on port 6001
✔  Channels are ready.
✔  Listening for http events...
✔  Listening for redis events...

Server ready!
Khi nhận dược thông báo như trên, tức server đã được khởi động và cài đặt thành công.
Tạo event khi có data thay đổi trên server
Sử dụng command để tạo event:
php artisan make:event UpdateUserEventCác bạn lưu ý chúng ta sẽ implements ShouldBroadcast
...
use App\Models\User;
use Illuminate\Contracts\Broadcasting\ShouldBroadcast;

class UpdateUserEvent implements ShouldBroadcast
{
    use Dispatchable, InteractsWithSockets, SerializesModels;

    /**
     * The user that created the server.
     *
     * @var \App\Models\User
     */
    public $user;

    /**
     * Create a new event instance.
     *
     * @return void
     */
    public function __construct(User $user)
    {
        $this->user = $user;
    }

    /**
     * Get the channels the event should broadcast on.
     *
     * @return \Illuminate\Broadcasting\Channel|array
     */
    public function broadcastOn()
    {
        return new PrivateChannel('user.' . $this->user->id);
    }
}
Function broadcastOn() sẽ tạo ra channel để client có thể lắng nghe ở đó. Có các tùy chọn channel khác nhau:
- Channel đại điện cho kênh public, tất cả các user đều có thể subcribe.
- PrivateChannel , PresenceChannel đại diện có các kênh private, phải xác minh trước khi subcribe kênh. Xác minh ở đây là đăng nhập vào ứng dụng thôi.
Ở đây mình nói thêm 1 xíu về PrivateChannel , PresenceChannel. Thì PresenceChannel chính là PrivateChannel nhưng PrivateChannel không phải là PresenceChannel. Vậy nó khác nhau ở đâu? Sử dụng PresenceChannel thì bạn có thể lấy được thông tin các user đang
subcribevào cùng 1 channel. Thì đương nhiên với lượng dữ liệu lớn hơn thì tốc độ của nó cũng chậm hơn. Các bạn nên cân nhắc khi sử dụng nó.Ở đây mình chỉ hướng dẫn về PrivateChannel. Mình sẽ làm 1 video để nói rõ hơn về cái này, các bạn theo dõi đón xem.
Mặc định Laravel sẽ broadcast sử dụng tên của class, nhưng bạn có thể tự định nghĩa tên bằng hàm broadcastAs
public function broadcastAs()
{
    return 'user.updated';
}
Lưu ý: nếu sử dụng
broadcastAsthì phía listen phải thêm (.) vào trước. Ví dụ như...listen('.user.updated') ...
Hàm broadcastWith sẽ định nghĩa những dữ liệu nào sẽ được gửi kèm trong các tin
public function broadcastWith()
{
    return [
        'user' => $this->user,
    ];
}
Đôi khi bạn muốn bradcast event khi thỏa mãn điều kiện trả về true. Bạn khai báo hàm broadcastWhen trong event:
/**
 * Determine if this event should broadcast.
 *
 * @return bool
 */
public function broadcastWhen()
{
    return $this->user->gender == 'male';
}
Vậy là xong, bạn chỉ cần fire event này ở nơi mong muốn, khi event được phát ra, queue job sẽ tự động broadcast event qua driver broadcast. Và tất nhiên bạn hoàn toàn có thể custom cái queue này cho phù hợp với ứng dụng của bạn.
Xác thực khi subcribe vào kênh Private
Trong file routes/channels.php, bạn có thể định nghĩa các xác minh để truy cập kênh
Broadcast::channel('user.{id}', function ($user, $id) {
    return (int) $user->id === (int) $id;
});
Lắng nghe sự kiện ở phía client
Cài các package phía client:
npm install --save laravel-echo
npm install --save socket.io-client@2.3.0
Edit file resources/js/bootstrap.js để lắng nghe event từ server-side
- Channel: giữ nguyên như đăng ký.
- PrivateChannel: thì tự thêm tiền tố
private-trước channel đăng ký. - PresenceChannel thì tự thêm tiền tố
presence-trước channel đăng ký.
import Echo from 'laravel-echo';
window.io = require('socket.io-client');

window.Echo = new Echo({
    broadcaster: 'socket.io',
    host:window.location.hostname +':6001'
});
window.Echo.channel('private-user.3')
    .listen('UpdateUserEvent', (e) => {
        console.log(e);
    });
Đừng quên chạy lệnh để npm để instal các package cần thiết để hoàn tất quá trình nha
npm install
npm run dev
Sau đó khai báo file script vào view và chạy demo
<script src="/js/app.js"></script>Lưu ý: Một số lỗi có thể sinh ra trong quá trình cài đặt
Phía Laravel-echo-server:
Client can not be authenticated, got HTTP status 403: Nghĩa là bạn chưa đăng nhập vào hệ thống và cố subcribe vào PrivateChannel hoặc PresenceChannel.Client can not be authenticated, got HTTP status 401: Bạn đang dùng middleware trongBroadcastServiceProviderví dụ như sau:Broadcast::routes(['middleware' => 'auth:sanctum'])và bạn không truyền token vào phần khởi tạo Echoresources/js/bootstrap.js. Fix như sau:
window.Echo = new Echo({
  broadcaster: 'socket.io',
  host: window.location.hostname + ':6001',
  auth: {
      headers: {
          Authorization : "Bearer " + accessToken,
      }
  }
});- Sau đó chạy lệnh để build lại file
app.js
npm run dev Phía Server Laravel:
Class 'Redis' not found {"exception":"[object] (Error(code: 0): ...: Vào fileconfig/database.php, đổiphpredisthànhpredis:
'redis' => [
  // 'client' => env('REDIS_CLIENT', 'phpredis'),
  'client' => env('REDIS_CLIENT', 'predis'),
  ...
]- Nếu cửa sổ command của
laravel-echo-serverxuất hiện channel khác với channel mà mình đăng ký: ở đây là thêm tiền tố: APP_NAME_database_private-user.3. Thì phầnprivate-user.3là để nhận biết PrivateChannel và channel_name. Còn phầnAPP_NAME_database_là phần tự sinh ra của thằng Redis này. Nó sẽ sinh ra một số lỗi ở phần subcribe vào channel mình sẽ nói rõ hơn trong video sắp tới. Tốt nhất các bạn nên để trống nó. Các bạn mở fileconfig/database.phpnhư trên, trong phần redis, các bạn thay đổiprefixtrong phần options thành “”:
'redis' => [
  'options' => [
      'cluster' => env('REDIS_CLUSTER', 'redis'),
//        'prefix' => env('REDIS_PREFIX', Str::slug(env('APP_NAME', 'laravel'), '_').'_database_'),
      'prefix' => "",
  ],
  ...
]- Nếu vẫn còn lỗi, hãy thử thêm thẻ meta vào phần head của trang vì có thể
Laravel Echosẽ cần phải truy cập vào session’s CSRF:
<meta name="csrf-token" content="{{ csrf_token() }}">và truyền CSRF vào headers của phần khởi tạo Echo resources/js/bootstrap.js:
auth: {
  headers: {
      'X-CSRF-TOKEN': document.querySelector('meta[name="csrf-token"]')['content'],
      Authorization : "Bearer " + accessToken,
  }
}
Khi Join thành công trên cửa sổ command của laravel-echo-server xuất hiện:
[3:14:10 PM] - Preparing authentication request to: http://127.0.0.1:8000
[3:14:10 PM] - Sending auth request to: http://127.0.0.1:8000/broadcasting/auth

[3:14:10 PM] - oXND5t1DZ-w1rmtAAAAL authenticated for: private-user.3
[3:14:10 PM] - oXND5t1DZ-w1rmtAAAAL joined channel: private-user.3
Sau khi gọi event và chờ queue chạy xong, trên cửa sổ command của laravel-echo-server xuất hiện:
Channel: private-user.3
Event: App\Events\UpdateUserEvent
và trên cửa sổ Console của website log ra được thằng user đã gửi qua channel là đã thành công cài đặt Broadcasting với Redis rồi các bạn. Từ đây bạn tha hồ sáng tạo những gì mình muốn.
Cài đặt Broadcasting với Pusher Channels

Các phần setup Providers thì tương tự như trên nha, update file .env:
BROADCAST_DRIVER=pusher- Đăng ký sử dụng
App\Providers\BroadcastServiceProvidertrong fileconfig/app.php
Các khái niệm về Channel, PrivateChannel và PresenceChannel tương tự như trên, và tên channel thay đổi theo loại cũng như trên, có gì thắc mắc các bạn cứ bình luận phía dưới và mình sẽ giải đáp thắc mắc. Nếu cần gấp các bạn có thể liên lạc qua các thông tin bên dưới.
Cài đặt Broadcast Driver
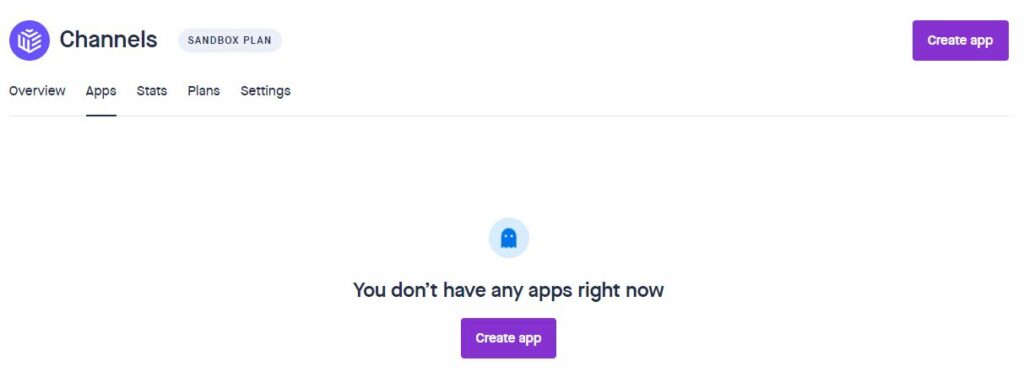
Đăng ký app trên web Pusher.com, sau đó cấu hình vào file .env để có 1 server lắng nghe client push message đến và trả về cho client khác.

Sau khi tạo xong sẽ có một trang hướng dẫn cách add thư viện cũng như config file .env
Lưu ý: Nếu sử dụng EU / AP cluster, có thể sinh ra lỗi và cập nhập lại options của pusher trong file config/broadcasting.php, mặc định Laravel sử dụng US server.
PUSHER_APP_ID=xxx
PUSHER_APP_KEY=xxxxxx
PUSHER_APP_SECRET=xxxxxxx
PUSHER_APP_CLUSTER=ap1
PUSHER_APP_CLUSTER là tùy vào vị trí các bạn đăng ký.
Ở đây mình sử dụng Pusher nên mình sẽ cài thêm thư viện pusher/pusher-php-server:
composer require pusher/pusher-php-serverLưu ý: Phần tạo event và xác thực vào kênh tương tự redis, và tất nhiên phải cấu hình và chạy queue:listen.
Lắng nghe sự kiện phía client
Cài package phía client:
npm install --save laravel-echo
npm install --save pusher-js
Edit file resources/js/bootstrap.js để lắng nghe event từ server-side
- Channel: giữ nguyên như đăng ký.
- PrivateChannel: thì tự thêm tiền tố
private-trước channel đăng ký. - PresenceChannel thì tự thêm tiền tố
presence-trước channel đăng ký.
import Echo from 'laravel-echo';

window.Pusher = require('pusher-js');

window.Echo = new Echo({
    broadcaster: 'pusher',
    key: process.env.MIX_PUSHER_APP_KEY,
    cluster: process.env.MIX_PUSHER_APP_CLUSTER,
    forceTLS: true
});

Echo.channel('private-my-channel')
    .listen('MyEvent', function (e) {
        console.log(e);
    });
Đừng quên chạy lệnh để npm để instal các package cần thiết để hoàn tất quá trình nha
npm install
npm run dev
Sau đó khai báo file script vào view và chạy demo
<script src="/js/app.js"></script>Lưu ý: Một số lỗi phát sinh trong quá trình cài đặt
cURL error 60: SSL certificate problem: unable to get local issuer certificate:
Fix như sau:- cacert.pem: click link và lưu file lại
;curl.cainfo =
curl.cainfo = “[pathtofile]\extras\ssl\cacert.pem”
Kết luận
Dưới đây mình đã giới thiệu về Broadcast cũng như cách xử dụng nó.
Tuy setup hơi mất công so với socket.io của node, nhưng bù lại nó lại bảo mật hơn.
Nếu có bất kì thắc mắc gì hãy để lại comment ở phía dưới nhé.
Nguồn tham khảo:
- https://laravel.com/docs/8.x/broadcasting
- https://pusher.com/tutorials/web-notifications-laravel-pusher-channels/
Rất mong được sự ủng hộ của mọi người để mình có động lực ra những bài viết tiếp theo.
{\__/}
( ~.~ )
/ > ♥️ I LOVE YOU 3000
JUST DO IT!
